From Meh to Marvelous
Michelle Carder disliked her bathroom for about eight years. And, just in case she hadn't convinced her husband, Mike, of her disdain, she left some subtle hints. First came the intentional neglect of regular cleanings. Then, came the dust bunnies and an accumulation of creepy crawly things. But the pièce de résistance was the love letterscratch that, hate mailon the back of the bathroom door. Its poetic verse went like this: So you say this is the last room to be remodeled ... whatever. The smiley faces and hearts softened the message. After three years of bold maneuvering, the day finally arrived when Michelle took a sledgehammer to the bathroom walls.
Michelle and Mike are fearless do-it-yourselfers. They also have a self-professed lack of qualifications as interior designers. Combine this with the crumbling structure of their 1902 Queen Anne home in Cadillac, Michigan, and there was no doubt that this little renovation would take them on a wild ride.
The renovation began in earnest, but as with any project, demolition revealed the ugly truth of what hid behind the ceiling, walls, and floor of an 118 year-old home. The flooring was removed to reveal plywood and the original subfloor, none of which could be salvaged. Mike had to tread carefully during the subfloor restoration to avoid falling through into the first floor butler pantry.
While Mike was walking a tight rope on old floor joists, Michelle was perusing Pinterest and home decor sites for inspiration and paint color ideas. As a four-time client of American Tin Ceilings, Michelle knew that this new bathroom would have its own tin ceiling. She said, A tin ceiling is the perfect bridge between the historical aspects of the house and the more eclectic and fanciful flourishes we have in this space and throughout the house.

During Renovation
Before Michelle could select her new American Tin Ceilings pattern, there were design decisions to be made. Much of her inspiration came from the home design website, Houzz. She even discovered an ornate tile replica for her new shower.
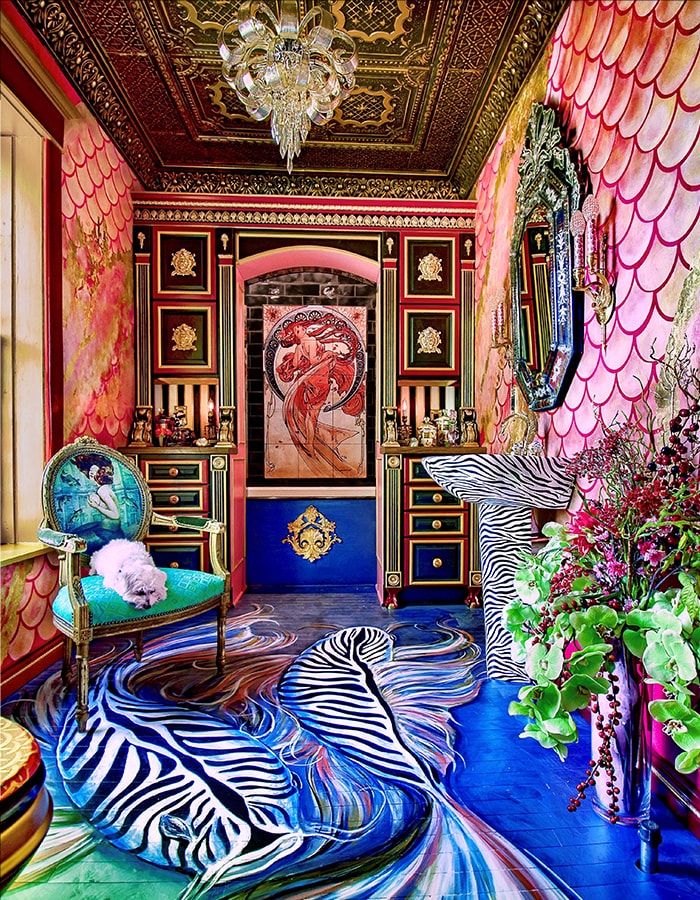
Michelle describes her overall style for this project as colorful, maximalist, whimsical, and eclectic. Her new shower is encased with a Chronicles of Narnia-type cabinet around it. The bathroom features ornate metallic detailing. She selected a pedestal sink that is covered with zebra stripes and a faucet that is shaped like a swan. The high-tank toilet is painted gold with a toilet seat that is painted with colorful dragon scales. The floor is covered with an ornate metallic fish scales design. The color palette includes cerise, metallic red, pink, copper, gold and black. The ceiling features American Tin Ceilings with a whimsical chandelier and specialty sconces. Whimsical indeed.
With a bold and eclectic design, Michelle wanted to retain a connection to the sophistication of a Victorian home. The design aesthetic of tin was perfect for the historical aspect. She chose tin Pattern 29 in Oil Rubbed Gold, for its dark underlay and gold accents. The intricate detailing of Pattern 29 matched the maximalist design, and created dramatic visual weight on the ceiling. The bathroom design is historically inspired and unapologetic.
Completed Project
Michelle and Mike's decision to use American Tin Ceilings went beyond aesthetics. They are a four-time customer, and have been consistently pleased with the product quality and customer support. When in the throws of a renovation, customer support is a tremendous value. The ease of their installation added a high-level of product satisfaction.
These fearless do-it-yourselfers have essential tips to share with American Tin Ceilings customers, to make the best of their installation. To note, Michelle says this product is easier to install than other ceiling products, and is more forgiving than you might imagine.
Essential tips developed over their four tin ceiling installations:
- Create a scaled layout to know quantities of tiles, filler tiles, and crown molding.
- Before installation of Nail-Up tiles, draw chalk lines diagonally on the ceiling to establish the center point. Start installation with the center tile and work outward.
- Use tin crown molding to cover crooked cuts and any flaws around the edges of the tile. It's difficult to have a perfectly even cut edge on the last row of tiles adjacent to the ceiling/wall juncture.
- Select crown molding with pre-cut corners, which will alleviate many headaches.
- Use flat molding to cover the junctures between filler tiles and patterned tiles, this will create a more finished look.
- Check nail gun pressure settings to ensure you won't shoot nails through the tin.
Last on the list is a reminder to those who are remodeling and renovating, to have fun.