How to Cut Tin Ceiling Tiles
One of the most common questions we get is, “How easy is it to cut tin tiles?” In short: very easy. Weighing just 1.6 lbs., our tin coated steel panels are flexible but not flimsy and malleable but not cheap.
Here's your basic step-by-step.
1. Safety First
- Always wear safety goggles and work gloves to protect yourself from sharp edges and metal slivers.
2. Measure and Mark
- Measure the area on the tin ceiling tile where you need to make the cut.
- Use a marker or pencil to mark the cutting line on the tile. You can use a straight edge or ruler to ensure straight and accurate lines.
3. Make the Cut
- Position the tin ceiling tile on a flat, stable surface.
- Cut along the marked line using tin snips or a guillotine cutter. Make sure to follow the line closely to ensure accuracy.
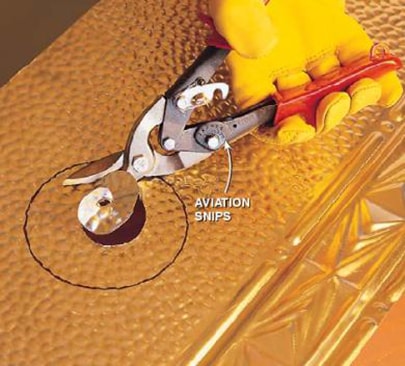
- For curved cuts or intricate shapes, you can use aviation snips with curved blades. These are designed to make more intricate cuts in metal.
Go to our installation library to see how it's done and follow along as you cut.
Need Help?
Tips for Cutting Tin Ceiling Tiles
- Go Slowly: Tin plated steel is easily cut, but it can still bend or warp if cut too quickly. Take your time and make slow, deliberate cuts.
- Support the Tile: If possible, use clamps or another support to hold the tile in place while cutting to prevent bending or warping.
- File Edges: After cutting, use a metal file to smooth any sharp or rough edges to prevent injuries and ensure a clean finish.
- Practice First: If you are new to cutting tin, it might be helpful to practice on a scrap piece of tin ceiling tile first to get a feel for the snips and the cutting process.
Choosing Your Cutting Tool
To cut tin, you have a variety of options, but we'll focus on our three favorites: tin snips, guillotine cutters and having your local metal shop do it for you.
Here's three ways to cut your tin ceiling tiles.
Use Tin Snips
Tinner's snips, also known as tinner snips or tin snips, are defined by their long handles and short blades. They usually have extra wide jaws and are made of drop forged carbon steel with straight pattern blades ranging in length from 7 to 14”.
While tin snips are by far the easiest and most accessible, if you're installing tiles in a location that's eye level like for a backsplash or wainscoting, it's recommended to use a guillotine cutter or have your local metalworker do it to ensure a professional factory edge.
Try a Guillotine Cutter
Similar to the paper trimmers you used to use in school or the office copy room, tin ceiling installers swear by the guillotine cutter. Our preferred model is the Martin Yale 19" x 24" Premiere Heavy Duty W24.
As a courtesy to our customers, we've made them available at a wholesale price of $212 + $25 S&H. However, any brand made for industrial use, not paper, should work as long as it can accommodate edges up to 24.”
Take it to Your Local Metal Shop
Check out our easy how-to video above for more information on how to cut tin tiles. As an aside, we don't recommend bending your tiles because you could risk damaging the powder-coated finish. If you need to join two together, it's better to cut and secure with nails or a construction adhesive.


