
8 DIY Tin Tile Fireplace Tips
When Jennifer (Jen) Lindsley, the Creative Manager of Renovation Brands, found a condo she loved, she felt at home. She was excited to officially claim it as her own when her offer was accepted!
Madison, Wisconsin is a large city with a rich history. Despite its size, it has a small-town community feel. Jen’s 20-year-old-condo—and its ‘90s-meets-modern-farmhouse vibe—fit right into the Midwest mold.
Working with home design in her everyday job, Jen was excited to become a homeowner and get her hands on renovation and design projects in her personal life.
Literally as soon as Jen walked in on her first tour of the condo and saw the 3-sided peninsula fireplace covered with ceramic tile, she knew exactly what she wanted to do.
The plan was to cover the fireplace from floor to ceiling with American Tin Ceilings tiles. This is one of Jen’s favorite products. She has wanted to use them since she started at Renovation Brands.
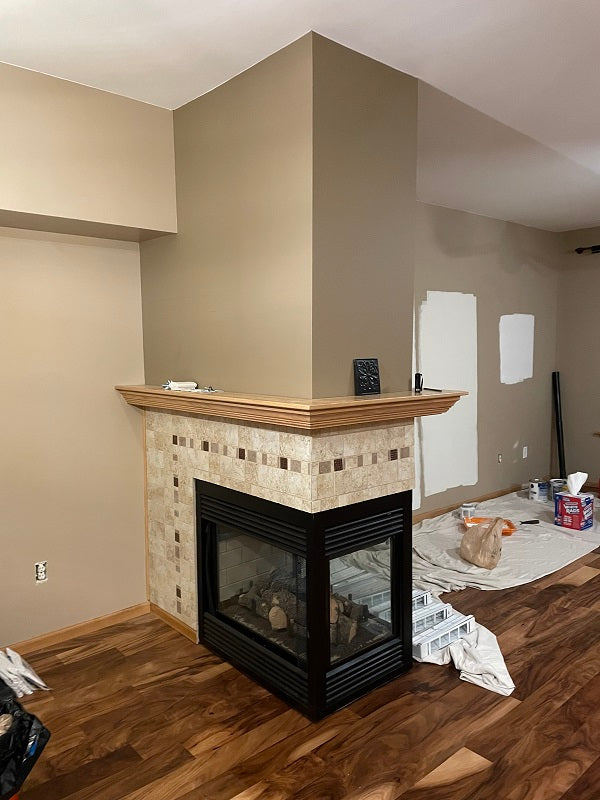
The Fireplace: Before Image
The see-through peninsula gas fireplace not only served as a soft divide to the semi open-concept condo, but the glass also allowed views of the flames from multiple surrounding rooms like the dining room, living space, and kitchen.
Jen knew the distinctive pressed pattern of a tin tile fireplace surround would set the tone of the entire condo–keeping the historic character of Madison intact while also adding edge to the existing color scheme and architecture of the home.
Tin Fireplace Tiles: A Hot DIY Topic
There are plenty of reasons why a tin tile fireplace surround or wall may spark a homeowner’s interest: tin tile at American Tin Ceilings is fire-resistant, made of .010 gauge tin-plated steel, and brings an all-American blend of something old and something new to any area in a home.
As with any DIY project, there are multiple ways to tackle challenges along the way. After learning first-hand, Jen shares eight helpful tips and tricks for homeowners and DIYers on what to do (or not do) when installing your own black tin tile fireplace surround and mantel combo.
Tin Tile Tip #1: Think Outside the Box with Design
The neutral palette of the kitchen—featuring oak wood cabinetry, matte black handles, and black quartz countertops with a white backsplash—was a defining factor on what direction Jen decided to go with the fireplace.
“Everything in this condo is very ‘90s, yet felt like a natural fit. In my heart I was thinking ‘let’s paint everything white!’ at first,” says Jen, who was used to decorating with white walls (and then adding pops of color with decor) in her former apartments. However, Jen decided to go against the grain this time with an opposite neutral: a black fireplace surround. Specifically, she settled on the Matte Black finish so that any pattern she would choose would have a non-shine, subdued feel that would complement the future Modern Farmhouse style.
“Envisioning a very modern and sleek aesthetic, I originally thought the large-square Pattern #1 would be perfect,” says Jen, “but when I saw the 2-foot samples in person (with the squares being 1 x 1 foot), they were pretty big ,” says Jen.
Rather than cutting off the large foot-long panels mid-pattern at the top and having a choppy finish, Sales Rep Jonathan, who assisted with this project, explained why a 6-inch (versus 12-inch) repeating pattern tile panel would be ideal. With this advice, Jen ended up pleasantly surprised on choosing—and loving–the 6-inch floral coin and arching diamond design of Pattern #3, which was a little more traditional than she normally would go for.

Above: In-Person Comparison of Three Different Tin Tile Patterns
“Something about Pattern #3 in this space brought some warmth and hominess to the space,” says Jen. As Jen learned, when it comes to your own tin tile patterns, think carefully about your options and try American Tin Ceilings’ website guides and special offers—from the Visualizer (which shows a virtual representation of a chosen tin in your space) to ordering a sample pack or reaching out for a free consultation with an American Tin Ceilings design representative.
Tin Tile Tip #2: Have a Can of Matching Paint Color for Wall Touch-Ups
If you choose a dark-colored tin tile that has any breaks in the pattern, Jen discovered that between where her mantel was positioned and where the tile would butt up against the mantel, there was a bit of space where the original white wall was showing behind the tin tiles.
Whether bought at the hardware store or chosen from American Tin Ceilings color-match sprays, Jen believes having a backup paint in the same or a similar color as your tin tiles is essential.

While touch-ups by hand are always a doable solution, Jen highly recommends rolling a coat of matching paint color on the full wall before the tin tile installation for a quicker and easier start/finish.
Tin Tile Tip #3: Try to Install the Mantel Before Tin Tile
When doing a full fireplace installation, what goes on first: the mantel or the tin tile surround? While either way is acceptable, Jen did tin tile first, but wished she had done it second.

“When you retro-fit the beams, little bits of tile would stick under the (already-installed) mantel,” says Jen, “and if we didn’t cut tiles straight enough, even the thin tile underneath affected how the mantel would sit on the wall.”
Especially since tin tiles have a pressed 3D pattern with bumps, if each piece wasn’t cut straight enough, Jen noticed the tin tiles did not tuck in underneath the mantel as neatly as hoped.
So Jen’s takeaway—install a mantel first, then cut tile pieces around it accordingly—for an easier and cleaner process.
Tip #4: Handle Tin Tiles with Extra Care—Easy Does It
Always remember to treat pressed tin tiles with extra TLC—from taking out of the box to the actual installation on the wall.
Although durable, American Tin Ceilings .010 gauge tin-plated steel tiles are also delicate. “Make sure to not scratch the tin tiles against each other, even when still in the package,” says Jen, “and note that each tin tile has very sharp edges!” She suggests to anyone handling this material to always wear gloves.

With the delicacy of tin tiles, one challenge Jen experienced was use of a brad nailer. Even with air pressure turned all the way down, the vibration of the gun was blowing the black matte powder coating finish off the tin and exposing the natural steel underneath.
Thankfully, there’s nothing a little paint can't fix. As advised in Tip #2, Jen was prepared with a backup can of black matte paint for touching up tin tile areas back to black in micro-spots where powder coating had chipped after nail gun application.
Tin Tile Tip #5: Bend and Straighten Tin Tiles in a Snap
One great property of tin tile is that it is physically flexible. Even on surfaces of the fireplace’s wall that weren’t necessarily super-straight, it was easy for Jen to press each tin tile up against the wall and reposition it to how she needed it to fit.

“Although thin, tin-plated steel is rigid enough where it won’t be hanging off or bubbled on the wall,” says Jen, “and you can definitely get it to lay flat, even when the wall itself isn’t necessarily super-flat.”
Any DIYer will appreciate tin tile’s ability to shift and shape up any discrepancies along the way.
Tin Tile Tip #6: Take the Edge Off (Literally) of DIY Mantel
The crew at Mantels Direct suggested to Jen to think about fitting the mantel on site, but she did not have a saw big enough to cut through the large mantel. The priceless solution to this challenge: being smart (and scrappy) by taking a belt sander and sanding down the back edge at an angle in order to get the mantel closer to the wall.

“We sanded little by little, and basically retro-fitted it ourselves,” says Jen. “It’s not perfect unfortunately; (there is a little gap at the top edge where you can see the boards aren’t lining up 100% evenly) but it’s also not severe enough to be noticed unless pointed out.”
Tin Tile Tip #7: Adorn (and Cover Wall Incongruities) with Molding
As noted in Tip #6, the not-square wall has a minor effect on tin tile application. This common issue is where molding and accessories come in handy. Jen chose to put up the thin and ornate tin girder molding, G1, “which basically wraps around the front corners of the mantel and hides the 1-inch difference where the black tin tiles fireplace surround pattern stops and starts.”


When it comes to a tin tile fireplace makeover, molding trim doubles as a finishing-touch aesthetic and a convenient camouflage (a tin-win!).
Tin Tile Tip #8: Think About Function (Over Fashion) First
Tin tile provides bespoke vintage appeal—but as mentioned in Tip #4, tin tile is a delicacy: stylistically and literally.

A plus with a black fireplace surround? Jen says she was able to choose regular 18-gauge brad nails, as rep Jonathan said the nails are small and hardly visible on the dark wall. However, for those who have a lighter-toned tin tile wall or prefer something more decorative, American Tin Ceilings’ Cone Head Nails—available in Copper, Stainless Steel, Steel, and White—are an attractive alternative.
Yes, Tin is In for Fireplace Surrounds
Tin tile process and tips aside, Jen is really looking forward to getting to the fun part of this project: styling and design! Soon enough, Jen can invite friends and family and gather around the cozy ambiance of a rustic-refined black fireplace surround. Stay tuned for a feature on Jen’s fireplace surround and mantel aesthetics later this season.


