How to Paint Tin Ceiling Tiles
Can you paint ceiling tiles? Yes!
Painting tin ceiling tiles is a rewarding way to add a personalized finish to your space while protecting the surface from rust and wear. Whether you prefer a sleek metallic look or a vintage distressed patina, this guide walks you through every step to achieve professional, long-lasting results.
Why Paint Tin Ceiling Tiles?
Painting tin tiles gives you full control over the final look of your ceiling while helping preserve the metal. Whether you’re aiming to create a bold focal point or a subtle design accent, paint allows you to:
- Match your tiles to your room’s color palette
- Enhance vintage charm or modern edge
- Protect tiles from rust and corrosion

Pattern #2 on the kitchen backsplash.
How to Paint Tin Tiles
Before You Begin: Safety & Surface Prep
Safety First: If you're painting older or reclaimed tiles, test for lead paint and wear a respirator if needed. Always work in a well-ventilated area and wear gloves, goggles, and a protective mask.
Prep Matters:
- Clean the tiles thoroughly with mild soap and water to remove dust, oil, and residue. Rinse and allow them to dry completely.
- Remove rust or imperfections using fine-grit sandpaper or a wire brush.
- Prime with an oil-based metal primer that includes a rust inhibitor. This ensures proper adhesion and prevents corrosion over time.
Tools & Materials
- Mild detergent and clean cloths
- Fine-grit sandpaper or wire brush
- Oil-based metal primer
- Paint (latex or oil-based depending on finish)
- Painter's tape & drop cloths
- Paintbrush, roller (velour recommended), or paint sprayer
- Optional: Polyurethane sealant
Our finished tin tiles are powder-coated which means they utilize a polyester resin that is baked onto the metal to make them strong enough to withstand the elements. If you purchase unfinished tiles, you must treat them before applying paint to achieve the same durability.
If you simply want to leave the panels silver but add a clear coat to seal them, it is recommended to use an oil-based polyurethane suitable for metal. You can also add a powder finish yourself.
Step-by-Step: How to Paint Tin Ceiling Tiles
1. Plan Your Layout
Before painting, plan the layout of your ceiling tiles. This helps you understand how visible each tile will be and where to focus any special finish techniques.
2. Apply Primer
Apply a thin, even coat of primer using a sprayer, roller, or brush. Let it dry fully per manufacturer’s instructions.
3. Paint Your Tiles
Apply 1–2 coats of your chosen paint, allowing proper drying time between coats. Use long, smooth strokes for uniform coverage. If you're using a roller, opt for a velour roller to avoid bubbles.
4. Create Specialty Finishes (Optional)
Want a vintage, aged, or two-tone look? Try these ideas:
Distressing: Lightly sand raised areas after painting to expose highlights.
Layering Colors: Use a darker base coat, then apply a lighter color on top and sand selectively.
Metallic Topcoat: Add a sheen with brushed nickel, gold, or bronze tones.
5. Seal the Finish (Optional)
For added durability and protection from moisture or abrasion, apply an oil-based polyurethane sealant.
Don't Want to Paint? Purchase Our Finished/Pre-Colored Tin Tiles

Installation Notes
- Nail-Up Tiles should be painted before installation.
- Drop-In Tiles can be painted beforehand or after they’re set into the grid.
- Snap Lock Tiles can be painted post-installation with care.
- For best results, paint tiles flat before installing to avoid drips and ensure full coverage.
Cleaning & Maintenance
- Dust regularly with a microfiber cloth
- For deeper cleaning, use a damp sponge with mild soap
- Avoid abrasive cleaners or strong solvents that could damage the finish
Design Inspiration: Color & Style Tips
One striking design approach gaining popularity is color drenching, where the ceiling, walls, trim, and sometimes even furniture are painted the same hue or tone. Using this technique with tin ceiling tiles creates a seamless, immersive look that can make a room feel more expansive or cocooning, depending on the color.
Choose a rich navy, earthy terracotta, or moody charcoal to establish ambiance and let the texture of the tiles add subtle contrast and dimension within a unified palette.
- White or Cream for a clean, bright traditional look
- Matte Black or Charcoal for dramatic, contemporary style
- Metallic Bronze or Copper for warmth and classic charm
- Custom Color matched to wall or cabinet finishes
Learn more about custom color tin tile at American Tin Ceilings. Talk to us today.
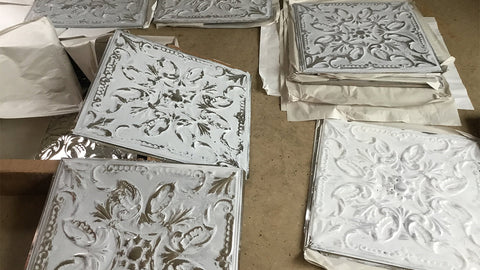
Perfect for retro or vintage looks, whitewashing (or color washing) is another popular design choice.
Whitewashing can be done on either finished or unfinished tiles, but we recommend starting with one of our powder-coated tiles that is sealed to protect against moisture. By starting with a finished tile, you can also choose an acrylic-based paint as a top coat, otherwise stick with an oil-based paint and primer (unless you are have stainless steel gloss or brushed satin nickel finishes).
For either type of tile, you never want to use a latex-based paint. Brush the tin in crisscrossing overlapping strokes, the more random the better.
For more on how to paint tin ceiling tiles or a tutorial on whitewashing tin tiles take a look at this project.


